Wednesday, December 12, 2018

Schoology can do that?


 Each week it seems like there is a new app that we can use to increase student engagement, foster creativity, or increase student performance. Many of these apps can be very effective, but it can be cumbersome to keep track of what does what and how many logins you have to different programs and sites. It has been awhile since we took a look at some of the lesser known features of Schoology, but many of these apps and features are available within Schoology with the added bonus of having all your students signed in with no additional work required! Some more popular apps and their Schoology equivalents are below:

1: FlipGrid VS Discussions with Video Reflection
Flip Grid allows you to create a grid of video based responses where students can make short reflections on their learning. In Schoology, it is possible to record video or audio clips as a method for any assignment or discussion. in order to do this, simply choose the microphone icon and follow the prompts to record.


2.  Poll Everywhere vs. Polls within Schoology
Poll Everywhere is a popular app that show real time student responses. Schoology has a similar feature that is located within the updates tab on each course page. Create a poll and students can respond to your questions and see the summary of what responses were.


3. Student Websites vs Schoology Portfolios
Many teachers use websites as a way for students to gather their work in a portfolio. Schoology has a built in portfolio feature that can be used as well. Click on your name in the top right of the screen and choose "my profile" in your profile, there is a tab labeled "portfolios". Here you can create pages and folders and even import assignments from Schoology.
Image result for schoology portfolio

There is a ton more that you can do within Schoology that emulates some of the more popular education apps. You can also add certain features like Khan Academy or other sites directly within Schoology. If you want to know more about consolidating the websites you use for teaching into one site, contact your friendly local Ed-Tech Coach!

Tuesday, December 4, 2018

Instructional Practices

Go to 10 different classrooms and you will see 10 different styles of instruction taking place. Kids learn differently. Teachers utilize different instructional practices. School districts have different resources available. All of these factors play into the learning of a student in a school. Here in the Westerville City Schools Educational Technology Department, we are hoping to help teachers reach their own goals of expanding their instructional practices to meet the needs of an ever-changing student population.

Recently, the WOSU Classroom came to Westerville (and other surrounding districts) to explore how learning was taking place. Their hope is to help these districts create "personalized learning opportunities for educators on researched-based teaching strategies that have a profound effect on student success."

In order to do this, they came into classrooms with cameras in hand in hopes to share a glimpse of what is happening in classrooms around central Ohio. They have created some short clips highlighting different instructional practices and posted them on their Ohio Learning Hub website.


We've highlighted some of the videos we like best below. (We may have some clear bias, but it's our blog, so that's ok...)

Authentic Task - National History Day


6th Grade Social Studies
Debbie Pellington, Westerville City Schools

Blended Instruction - Constructing Your Own Learning


9th Grade American History
Damon Mollenkopf, Westerville City Schools
We love highlighting the great things our teachers do in the classroom with students! We also love helping other teachers achieve their instructional goals throughout the year! So take some time to watch the videos on the website, and let your building Ed Tech Coach know how they can help you achieve your goals!
#WestervilleWay #WCSwhereUbelong


Wednesday, November 14, 2018

Pretty Fly for Our WiFi

In our district, there are three WiFi networks that Chromebooks have access to: Guest, Inet, and WCS. Each have different levels of network access. Make sure you are using the right one to meet your needs and avoid the panic when a site you swore worked yesterday no longer works by following the tips below!


Guest: This is designed for visitors to our district. Depending on where you access this network from, you may need to have a sponsor that can approve your accessing the network. This is also the most limited network. There are a large number of blocked websites. 

Inet: The Inet is the default setting for many of the Chromebooks and is most like what students have access to. It has a medium level of access to sites. If you are having trouble accessing certain websites or portions of websites (videos, images, etc.), this is a good place to look first in your troubleshooting. Many sites use larger hosts like Amazon or Google for their content and they will occasionally be blocked by this network. The login information for this network is programmed into the Chromebooks. 

WCS: This network is tied to your login information, so it gives teachers more access to sites they may need.  It is the least locked down of the websites and offers access to a number of sites that may not work on other networks. If you can access a site like Netflix to show a documentary or instructional video from your desktop, but not on a Chromebook, you are most likely not signed into WCS on the laptop. In order to sign in there are a few steps that you need to take. 
1. Go to the toolbar at the bottom of your screen and click on the clock at the bottom right
Image result for chromebook toolbar
2. Click on the WiFi symbol and choose WCS
3. Fill in the login info...
-You will need to do several things in order to do this:
a. Change the EAP method from LEAP to PEAP. 
b. Type in your username (whatever your Google login is minus the @westerville.k12.oh.us
c. Type in your password- the same that you use for Google login. 

You should be connected! Happy Interneting! As always, if you have questions or want to know more about the technology available to you, contact your friendly neighborhood ed-tech coach!


Thursday, November 8, 2018

Accessing Student Account Information

"Hey teacher! Do you know my password for..."


We've heard it a hundred times. Kids forget their passwords or parents need to know how to access some of the digital products we offer. In Westerville, we have three main passwords that students and parents need to know in order to get access to most of their digital products.

1. Google
2. PowerSchool
3. Schoology - parent access codes

Often times I hear that students have gone to the office to ask a secretary or a counselor for their passwords. But teachers have access to these as well and are typically the best contact for a student or parents trying to be involved in the digital side of a student's education.

All of the passwords listed above can be found in the PowerSchool Administrative portal. Teachers can access this by going to the Westerville City Schools main website.


From there, teachers can sign in using their district username and password. District staff members with PowerSchool access can find these by searching for the student in PowerSchool, clicking on “Custom Screens”, then clicking “Student at a Glance (Parent Permissions).”


The parent access code for Schoology is needed by parents if they would like to create their own Schoology account and connect it with their child. They will be able to see all of their student's classes and submitted work, connect with the classroom teacher, and check grades and comments. This only has to be done one time, as the courses they see will be updated yearly to reflect the student current course enrollment.

The Student Google account is what kids need to sign in to district desktops, Chromebooks, and their Google account at home. From there they can access other digital products the district owns independently or using the Clever app provided.

Lastly, the PowerSchool access ID and password is provided for students and parents to be able to access their official grades and schedule. 

Having access to these passwords can help a student save a lot of time by removing the need for them to attempt to get them from someone working in the front office. 


With power comes responsibility, so make sure that you are only giving passwords to approved people. Never email a password. Finally, please make sure you log out of websites that host passwords to ensure that people near your computer aren't able to access confidential information.

As always, contact your Ed Tech Coach if you have any questions or want to talk about how to implement new ideas in your classroom with your students! #WestervilleWay


Friday, October 26, 2018

Showing Safe YouTube Videos to Students

Image result for safeshare.tv image

Our district has filtered access for middle and high school students to view approved YouTube videos while at school, but K-5 students are blocked from viewing them on their own. While there are many concerns and reasons why elementary kids should have a very limited access to all the material widely available on YouTube, there are also many educational topics that can be found on YouTube. 

On the tech side, there are many ways in which YouTube videos can be embedded (in Schoology, on a Google Site, etc.) but those are still pulling the original video from YouTube, and therefore blocked with our filtering system. Teachers have been showing content rich YouTube videos to students as a whole class using a teacher account to access the material, but when offering specific videos to students to watch at their own convenience hasn't been possible.

Until now.

Safeshare.tv is a site that allows a teacher to find a specific YouTube video, enter the URL into the Safeshare.tv window, and safeshare tv will create an entirely new video solely using the video content from YouTube. This removes any ads, additional video bars, and teachers can even crop the video to focus on a specific part of the video that they wish their kids to view.

The video that is created no longer pulls from YouTube, and therefore is not blocked by our filters. Only teachers who have access to YouTube can pull videos to put into safeshare.tv, and then those links can be shared with students for them to view when appropriate.

Check out this tutorial video on how to use Safeshare.tv, by watching a YouTube video that has been imported into Safeshare.tv! 


As always, contact your Ed Tech Coach if you have any questions or want to talk about how to implement new ideas in your classroom with your students!


#WestervilleWay

Thursday, October 25, 2018

Using Technology to Bridge the Gap for Teacher Absences

From time to time even the strongest immune system can be foiled by a few germs. But you can still make the most of those days by using technology to bridge the gap. As the “season of sickness” looms ahead of us, here is a valuable article from Common Sense Education on the ways you can use tech tools to make the most of sick days or when you have a guest teacher. Stay well! But just in case...


We hope this helps! If you have any questions or need some help, don't hesitate to reach out to your building's Ed Tech Coach!

Monday, October 8, 2018

The Embed Code: Getting all your content in one place

One of the downsides of using technology for lessons is that the content that we teach is rarely in one place. We get greater control over the content, but this often means grabbing video, audio, and text from a variety of sources. At the same time we know our students- the more clicking to get to content, the more issues will arise. It can be frustrating to have the perfect content available, but no easy way to get it to students without an unholy amalgamation of links, text and pictures.   Enter the Embed Code. A handy way to get content on one page.

Most web content creators and hosts like YouTube provide embed codes that allow users to insert direct, interactive links to content into their site. For example:
The embed code allows you to bring multiple sources of content into one place. You can even embed a website into another website! They can look intimidating, but the process is much simpler than you might think. Follow the steps below to insert content into Schoology or other sites. 

How to Embed Content into another site
1. Find the content you want to insert
2. Many sites have either an embed button or a share button where you can find the code. If there is not one,this site has a way to do it through a process called the iframe. 
3. the code you embed will look something like this <iframe width="560" height="315" src="https://www.youtube.com/embed/i9SSOWORzw4" frameborder="0" allow="autoplay; encrypted-media" allowfullscreen></iframe>
Wait! Don't be intimidated!
Image result for don't be intimidated gif
The great part is that you don't have to understand how HTML code works or even what is inside the code to embed it.

4. copy the code
5. Go to your Schoology page and access your assignment, page, or other place you want the content to appear and follow the steps in the picture below
Image result for embed in schoology

Now your content should appear! Schoology and other sites also play nicely with Google products like Drive and YouTube. The insert content button on many pages allows you to import embed code directly without having to follow the steps above. 

Image result for schoology insert content google
6. If you are using a different site, the process is similar, you just need to find a way to switch to HTML view for a moment. Sites like Weebly, Blogger, and Word Press all have these options. 

A few tips:- You can play with the width/height numbers in the code to adjust the size of the content you embed. 
-The Publish button (under file) in Google Slides, Docs, and Sheets can provide an embed code so you can directly link content into a page too (again, Schoology has easier ways of doing this through the Google Drive App, but for other sites it can be a useful tool.).
save image-Many content creation sites like blogs, web design programs, and learning management systems have a button or menu choice to switch between HTML view and WYSIWYG (what you see is what you get) view. HTML view is where you can paste in code.

As always, feel free to contact your ed-tech coach with any questions or to learn more!

Happy Embedding!

Tuesday, May 22, 2018

How to Create a Schoology Course for the Summer

Image result for schoology

Want to create a Schoology playground for the summer? Creating a course on your own will allow a place to add materials and test the different functions without students in the course. 

Watch this to see how its done!


Or check out Schoology's Help Desk resources for more info!

If you have any questions or need some help, don't hesitate to contact your Ed Tech Coach!

Wednesday, May 16, 2018

I'm leaving Westerville City Schools, now what?


Image result for google takeout
Over the past years we've been creating, sharing, and learning using Google's G Suite of products (Docs, Sheets, Slides, etc.). These products have been an amazing tools in the educational setting. However, the products were all used using a Westerville Google account that was created and owned by the district. So what does someone do if they are leaving the district (i.e. graduation, retirement, etc.)

This is where we introduce you to Google Takeout!

Image result for google takeout

Google Takeout allows individuals to either download or transfer all of the content they own within G Suite so they can use that material with a different account outside of the Westerville domain.

Google actually makes the process pretty easy. Just follow the steps they provide in their help center.

If you are not sure if you will be using a personal Google account with this material later, use Google Takeout to download all of the content to be uploaded/converted into whatever product you will using later. This downloads an archive of all your material to be saved on an external storage device (i.e. flash drive). Once a new account has been created, these files can be uploaded and converted into that account's format. NOTE: some formatting may not stay consistent in the conversion.
You can find Google Takeout HERE.
Image result for google takeout

If you plan on using this content with a personal Google account later, use Google Transfer. This will simply take all of the material in the Westerville created account and transfer it to a personal Google account.
You can find Google Transfer HERE.

Image result for google transfer

Westerville Central's own Amy Farris has put together some amazing directions specific for Westerville students. You can read them HERE!

We hope this helps! If you have any questions or need some help, don't hesitate to reach out to your building's Ed Tech Coach!

And if you are using either of these products, the WCS Ed Tech Department just wants to say...


Tuesday, May 8, 2018

Spotlight on Pointview's Efforts to Reach Parents and Strengthen Communication

Creating a communication system that is accessible to families, supports a wide variety of content, is easy for staff members to use, and doesn’t cost any extra money is a dream for many school leaders seeking to build stronger school-home connections. Pointview Elementary principal Sherry Birchem is one such leader. Sherry is in tune with the needs of her families and her staff and has worked diligently to build a strong sense of community in her building, including spearheading the effort to streamline school-home communication. After many trials, Sherry has found the system that fits the bill: Schoology. Through making use of Schoology's easy sign-up process, closed system for sharing images and video, and ability to send emails and text messages to families when updates are posted, Sherry is set to create a robust communication system that meets the needs of Pointview’s staff and families.


Watch this video to learn about how Sherry is working to better connect the Pointview community, including what she has tried in the past, why she is excited about Schoology, and what lies ahead:


Interested in setting up a school-home communication system in your building through Schoology? Contact your Ed Tech Coach today!

Thursday, May 3, 2018

Alexa, Siri, Google, whoever you are, set up voice control for my classroom.

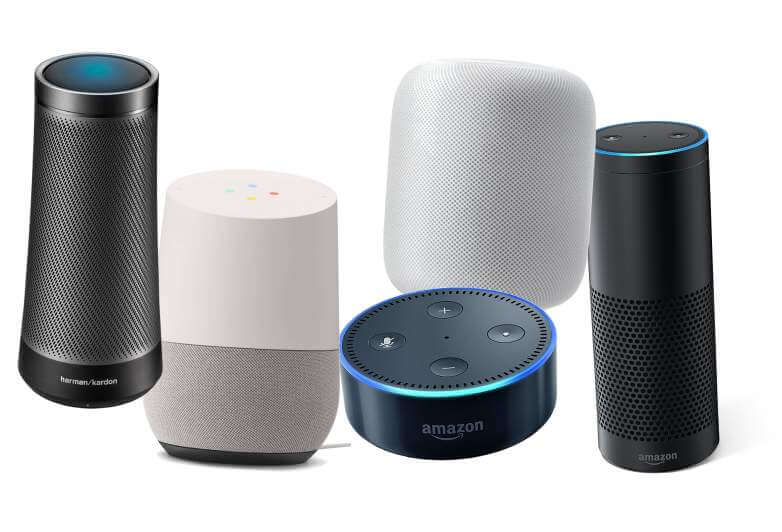
The ever more ubiquitous Amazon Echo devices and other smart assistants like Google Home are great for home use. If you have one, you may have already realized some of the things it can do: play music, change the thermostat, read recipes, and a host of entertainment options. Most of these functions come from third part apps. There are thousands of existing skills or apps with more being added daily.  One of the most useful functions is that a smart speaker has an answer to most questions you can ask. If you ever wondered what imitation vanilla extract is (you don't want to know), Alexa or Google has the answer. While all of this is a nice gimmick and a fun addition to your home, smart home  devices have some useful applications for school as well.
Image result for smart speakers

1. Automating class procedures: Smart home devices can set timers, play music, keep calendars, and play reminders for transitions in classes allowing the teacher and students to focus on learning.  They also has a number of built in skills like rolling dice, picking random numbers, picking cards, calculator, thesaurus, and dictionary functions as well. Simply ask for what you need and you get it!

2. Specific questions: Smart home devices can also help students to find basic answers to questions they may have. If the teacher is busy working with a student and someone wonders how long the Great Wall of China is, they can ask and get an immediate answer all through using their voice.
Image result for alexa in classroom

3. Custom Skills: Amazon recently created a system for creating custom Apps called Skill Blueprints. You can choose from a variety of premade templates to create skills that can assist in the classroom. There are a large number of options, but some will be more useful in the classroom than others.

-Storyteller: Students and/or teachers can create custom made, interactive stories that follow a genre theme. Right now there are options for fairy tales, sci-fi, fables, and adventures.

-Custom Q&A: set up custom questions and answers for common questions in the classroom

-Babysitter: Avoiding the name, this skill allows you to set up instructions and steps to follow. This could be very useful for when a sub is in the room, or for setting up recurring sets of instructions for classroom procedures.

-Quiz/Flashcard programs: You can also create quiz and flashcard skills that are custom built for any subject area you might want. You can choose the questions, answers, and hints. There is a learn mode and a test mode for these skills as well.

-Others: To add a bit of fun depending on your classroom, there are customizable jokes, inspirations, insults, and games that can be used in the classroom as well.

But Wait! There's more!
Chromebooks have a built in voice assistant as well. It is turned off by default, but can be turned on. While there is not the level of customization available that Amazon has (for the moment) It can be used to control Google searches, timers, calculators, and other basic functions using your voice. If you would like to set it up, follow the instructions here

If you have a smart device at home, try out the  features and consider if it would be a good addition to your classroom. If you are interested in learning more, contact your Ed-Tech Coach! or check out the additional resources here:
ITSE on the use of digital assistants

Friday, April 13, 2018

Create 360 degree images with Google Street View

Image result for google street view


With all the ways that educators are using virtual reality in the classroom, its important to note that you can create your own 360 images using Google Street View!


Google Expeditions packages are in a few of the Westerville City School buildings, and kids are having a blast looking at images as if they were in the location of the photo.

google_expedition_logo

Image result for google expeditionsImage result for google expeditions     


Using the Google Street View app [iOS / Android] on any phone or tablet, individual users can create the same type of images that are used in virtual reality applications. Just open the app and it will guide you through taking multiple shots from one spot. Google then stitches the pictures together to make a 360 degree image! These images are stored privately with your account, or you can publish them and add them to Google's searchable images.

Here's how it works:


Did you visit the Grand Canyon over the summer? Did your students attend a trip to Washington, D.C. over spring break? Do you have a relative that lives near the ocean? Why not start capturing these real life images and have kids visit the world without leaving your classroom?

Google is also expanding Expeditions to include augmented reality as well...


So how could you incorporate virtual reality, augmented reality, or other remote viewing technology with your students?

Don't be afraid to try! (Its easy enough for a sheep to do...)


As always, if you have any questions about how this could work with your students, don't hesitate to contact your building's Ed Tech Coach!

Friday, March 23, 2018

The Augmented Reality Sandbox in Action

If you read our earlier blog post on our district’s Augmented Reality Sandbox, you likely have an idea of how the tool can enhance student learning through hands-on and experiential activities. As the sandbox has made its way to different buildings in the district this year, our creative teachers have added their own spin to how they use the sandbox to engage their students.

Amber Korn at Huber Ridge is one such teacher. Amber took full advantage of the sandbox’s time at Huber Ridge to deepen her 4th graders’ understanding of weathering and erosion. Working in stations, students built landforms, reproduced natural events, and observed the impact of weather on topography. While they greatly enjoyed building mountains, digging out lakes, and causing earthquakes, the most exciting part for many of the students was making it “rain” in the sandbox with virtual water. By making it rain, they were able to see the movement of the water and predict the impact water has on landforms. But Amber didn’t stop there! She brought the learning experience home through the use of higher-level thinking activities. Once everyone in the class was able to experience the sandbox, the students got together and connected what they had observed in the sandbox with what they had already learned about landforms, developing a more thorough understanding of the meaning and impacts of weathering and erosion. The class created a collaborative document detailing their understanding of these concepts and each student made their own artistic representation of the impact weathering and erosion have on Earth’s landforms. Through manipulating the content in multiple ways, Amber used the power of experiential learning to engage her students and bring her science unit alive in a new and exciting way that her students won’t soon forget.

Watch this video by UCLA to see how the AR Sandbox works.


The AR Sandbox has great potential for any grade level and subject, such as illustrating point of view, making inferences, solving multi-step problems, demonstrating cause and effect, creating sculptures that reflect contour lines, and even helping students process emotion, to name a few. Want to experience the AR Sandbox for yourself? Good news! The sandbox will be a part of Westerville Partners for Education’s Starry Night event on April 8th at Westerville North High School. Come and check it out!


If you would like to explore how to use the sandbox with your students, contact your Ed Tech Coach!

Friday, March 9, 2018

Capture the Flag


Hacking


Hacking is a scary word that most people hope they never have to hear used in a conversation about them or their personal information. As we move to a more digital world we are constantly faced with cyber security issues to keep our digital information private. As the world increases the amount of information available digitally, the world also needs more people to keep that information secure.


This is why the Ohio National Guard has created the Ohio Cyber Collaboration Committee (OC3). This group has been tasked with increasing the number of people qualified to work in the field of cyber security. They are starting by creating a place for high school students to learn how. Inside the OC3 Cyber Range, students have a chance to play "Capture the Flag" in a virtual world. The goal is for kids to learn how to hack into a virtual system so that they can eventually become people who will defend against similar types of attacks in the real world. The hope is that cyber security clubs will be created in schools across the state in the near future.

Westerville North High School hosted a Capture the Flag event this week. The event brought cyber security experts from the military and private sector in to help students from around central Ohio hone their skills. The event took place in "The Shop" where a leader board tracked how effective the kids were "hacking" into different systems.


In addition to cyber security experts, the event was also attended by members of the Westerville City Schools District Office and members of the Ohio Department of Education (including the State Superintendent). This event created quite the media frenzy!


(By the way, a Westerville kid ended up winning. #JustSayin')